Sunday, September 30, 2012

Cardboard Box


I had seen a couple different posts on Pinterest about turning a cardboard box into a storage box using fabric. Well of course I couldn't find it again. I decided hey why not wing it. 

I used an old cardboard box I had gotten from amazon. Using some fabric and and mod podge I went at it. The end result wasn't too bad but I wouldn't of used mod podge. It left some dark marks where it saturated the fabric.

Tuesday, September 25, 2012

Ombre Hair

So I saw some pictures of people with red to blonde ombre hair. I figured I'd try it out. So I bought these two hair dyes. Turns out, I have waaay to much hair so I needed two boxes of each.


I dyed all of my hair the light blonde color. It came out decent, but not as bright as I thought I might get.


I had one of my friends help me out for the next part of actually dyeing my hair. First I made sure my hair was all dry. We used a small paint brush and worked from the top to the bottom putting the dye on the roots and brushing it about halfway down. The end result...


Not too shabby!


Sunday, September 16, 2012

Wine Bottles


Empty wine bottles make great decorations. I spray painted these black, about 3 coats, and then put some stickers on them and fake flowers for decoration. I also made some white and plain black ones and put some candles in them as a center piece. I want to do some more like this for my wedding reception.

Picture Collage


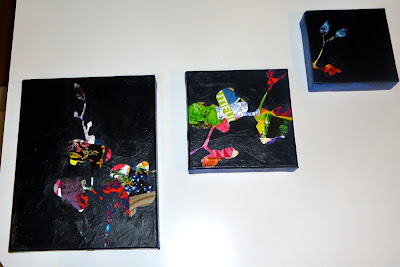
I used three different canvas boards and blew up a picture of orchids. I created a collage from some magazines and mod podge. I then lightly glued down the outline of the orchids across the three canvases and painted around the stencil. I painted a dark blue on the edges of the canvas so that they weren't white. Once completely dried I took off the stencil and cleaned up some of the edges. Because the mod podge never completely dries I sprayed a Krylon acrylic sealer on top. 

Baby Quilt


This was my first quilt EVER!!! And it was a lot easier than I thought it could be. 
(This quilt was made and I then I made the burp clothes to match the color scheme.)

I bought two charm packs, square quilt pieces, to create this quilt. My ocd made it harder for me to lay out the pieces and make it look random, my mom helped by completely screwing up what I did. I watched a tutorial on you tube to learn how to sew the quilt correctly and it worked! I bought a light weight batting because my nephew it was for is in Florida and it's never really that cold. I also bought a blue fabric for the back of the quilt and as a border. I made a 4" border for the quilt and the size was perfect for a child to grow into. 

The quilting pattern I did was very easy since it was my first time. I followed the seems of the squares and the border. It made a very simple checker design on the back to mimic the front. 

Part 1

Part 2


Part 3


Part 4


Baby Burp Clothes


I personally think these are amazing for young moms. Who wants to have nasty looking burp clothes, a little style isn't a bad thing. I promise this is really easy, theres just small details to explain. =)

Get a pack of cloth diapers from walmart. They come in packs of 10. At ACMoore get whatever color fabric you want near the quilting squares, 18" x 21" will make two burp clothes. 

Make sure to iron the fabric to loose the creases. Fold the fabric in half, if you iron in a crease it will help you to cut it. Once you have two pieces fold under the sides and iron a 1/4" border around the entire piece of fabric.

Once all of the sides were folded and ironed I ironed the fabric, borders facing down, on top of the cloth diaper and it helped the fabric to stay in place. Sew the fabric down to the cloth diaper a 1/4" on all sides. I had the stitch continue down the entire length of the fabric and had it criss cross at the corners.
*When I sew on the machine I make sure to stitch at least once at the beginning and at the end in reverse and forward again to seal the stitch in place and keep it from unraveling. 

Saturday, September 15, 2012

Ticket Stubs/Coupons


I was creating some "coupons" for a friend of mine. This is the template I created for the fronts and backs. Here are the blank ones though so you can make it into whatever you feel like. 


I had a little fun with the terms and conditions on mine.


I found these ideas online, a girlfriend had giver to her boyfriend. Maybe some good ideas are her for my husband. Comment with any ideas you may have created yourself for a husband, friend, or child.


Paint Boards


Gallon size Zip Lock bags
Duck tape
Cardboard
Q-tips
Finger paints

Cut cardboard pieces to the size of the gallon zip lock bags or about 1/2 and inch larger. Fill the gallon bags with the finger paints in whichever colors your kids want to play with. Remove any air from the bag and secure the top completely shut. Duck tape all of the edges to the cardboard making sure to secure the ziplock side. Make sure your kids know NOT to use their fingers or they will no longer be able to play with it. I suggest giving them some q-tips instead of fingers to keep from tearing the bag. Great toy for long car rides.

Sidewalk Chalk-Paint


So keeping a 3 year old busy is a struggle....this came in sooo handy on a gorgeous day.

1 c Corn Starch
1 c Water
Food coloring


Takes 5 minutes to mix together, equaled about 2 hours of play time. He even asked me to make more! This however does stain hands, I was able to wipe most of it off of his clothes as well but I can't guarantee that for everything. Once it rained it all washed away just like chalk would.

Friday, September 14, 2012

Coasters


This is a very simple project. All you need are some tiles from home depot, usually only about 15-20¢ each, some scrap book paper or a picture, mod podge, cork or felt, heavy duty water proof sealer/glue, and Krylon acrylic sealer.

cut the cork or felt to cover the bottom of the tile and water proof glue it to the bottom. I used a heave strength crafting glue which worked awesome. 

Cut the picture or paper for the from of the tile. The tiles I bought were 4 1/4" so i cut the paper 4" even to have a little border.

Brush some mod podge on the tile, then position your picture/paper in the center. cover the picture/paper with mod podge. Be careful not to brush it too much or the ink will bleed if it's printed and the paper will start to bubble.

Let them dry completely, and DO NOT STACK THEM!!!

Once they are fully dried spray with the Krylon sealer. I put two coats on my coasters just to be sure.

Can easily be made as a holiday theme, or gifts.

Candle Light Banister


In my parent's house has always been this really random brick wall. A while back mom got sick of it being red and painted it white. I saw an idea on a home makeover tv show about using candles and mirrors to help make a space brighter and larger. I measured the brick wall, went to Michael's and found these very inexpensive stick on mirrors with a beveled edge. Did some complicated math of dividing the length by the width of the mirrors to figure out how many I needed. I then went over to the candle section and picked up the same number of votive candles and jars as mirrors. My ocd made it so that I picked the candles not by their smell, but by what color matched the room. 

The trickiest thing about this project was aligning the mirrors to seem as if they were going in a straight line since I found out after getting home that the brick wall was slightly crooked. WARNING!!! The mirrors REALLY do stick! Once they went on there was no taking them down. (Sorry dad) Simply place one candle in front of each mirror and your done! 

During a hurricane we lost power. Those candles and mirrors made it seem as if we had lights.

Mr & Mrs Pillow


I bought a 6$ pillow from walmart, self print iron on shirt decal paper in the office sections, and used some scrap fabric I had from another project. I printed out the picture of the bride and groom penguins as well as some pretty script Mr. & Mrs. on the iron on decal sheet.

I did attempt to iron the decal onto the pillow at first ignoring the instructions for the decals to iron on the fabric with a second piece of fabric under it. It resulted in the decal being melted into the pillow. So I tried again, this time following the instructions. Make a world of difference!! I used a little piece of batting behind the finished couple and stitched the fabric to the pillow.

My penguin loving husband was very happy to see the pillow I made, and sleeps with it every night. Looks like i'll be buying more 6$ walmart pillows.

Quote Scarf


I bought a white scarf, fairly cheap. Got a black fabric pen from AC Moore.

Iron the scarf to get rid of any fold lines or wrinkles. Place an old sheet or towel underneath the scarf so that the ink doesn't leak through and ruin your work space. I chose a quote that my husband and I use and began writing. If you aren't that good at keeping straight lines I suggest ironing in a crease every few inches to give your self lines to follow. I was able to write the quote about 3 times (and yes I screwed up.....but you can't tell =)) I finished it off with a heart. Wash the scarf before wearing it.

Frosted Candle Vase


I took an old vase we had around the house, wrapped some old rubber bands around it to create some slanted lines all over. I used a white spray paint, but I suggest buying a frosting spray paint instead, and lightly sprayed the outside of the vase. After letting it dry for about 5 -10 minutes I removed the rubber bands. I used a battery candle in mine, but a real one would work just as well.

Yarn Lettering


Pretty kitty

For this craft I used an old wire hanger. I cut the hook part off and started by straightening out the wire. I then bent it to create the word "Love". Once the word was formed I used black yarn and wrapped it around the wire. To start it off I simply wrapped the yarn around itself to hold in place. At some of the points where the wire criss crossed I wrapped the yarn around both pieces to keep it together better and add some stability. To finish it off i wrapped the yarn around itself again and knotted it through a couple times. Just trimmed off the end and was all done.